Notes on Saving #
If you need to save the project as you are working on it, you can just save the audio file as an audio file, but I recommend going “File, Save Project” which will also save any multiple tracks, undo history (I think), recently used effect settings, and more. This project file is sort of like a .psd vs. an image file; in photoshop.
Step 1 – The Room #
Close the door. Draw the curtains. Go into your closet where the clothes muffle reflections maybe, Turn off the TV. Wait until less traffic noises happen. Wait for the plane to fly past. Etc.
Step 2 – Your Voice #
Read from a script. Trust me, you want to read from a script. It will keep you from going “uh” or “um” subconsciously, and frees you up to think more about your performance and less about the words you are saying while recording. Have a glass of water to sip on to clear your throat with. When recording stand 3-5 inches away from the microphone. If you are in the lab, keep the pop-filter (fabric circle) between your mouth and the microphone. Take even, deep breaths. Don’t rush through everything in one breath. We can delete silent parts from the audio, you don’t need to restart completely. Do a few takes and compare, see which one you like better.
Step 3 – Record #
The Blue Yeti microphone is not a stereo microphone (but it does have stereo output), so set it up as a mono one in the toolbar. For voice-over, even with a stereo microphone, it can just be mono.

Don’t forget to record a few seconds of clean silence at the beginning and end of your recording.
Step 4 – Normalize #
Select all (ctrl+a), then go to effects>Normalize. Defaults are fine. This makes everything loud.
Step 5 – Initial Edit #
Trim the silences from your audio. Get rid of small click noises or lip smacks. If you can’t cleanly delete or de-amplify these parts, just re-record. (re-record now before you really get editing).
Step 6 – Noise Reduction #
Now that you know this audio is a good final take, we can edit it more without fear of doing unnecessary work. Select the silence from your recording, which isn’t actually silent, but background noise, microphone noise, room tone, and other static. With that selected, go to Effects>Noise Reduction, and click “Get Noise Profile".
Now Select all, then go to Effects>Noise Reduction. First try the defaults, then try to be a bit more aggressive with the noise reduction. If the silence is now perfectly silent, you have probably gone too far, because you are reducing more than you need too. This will affect your voice, not just the noise, so you want to make sure the voice still sounds good. Reduce as much as you can, but don’t let it make your voice sound hollow. Trust your ears: undo, redo, preview, etc.

Step 7 - Compression #
Listen to the recording while watching the meter. Pay attention to what level sounds pretty good, and what levels are when the recording gets a bit too loud. For me, after normalization, this is usually around -12db.

Select all and go to Effects>Compressor…
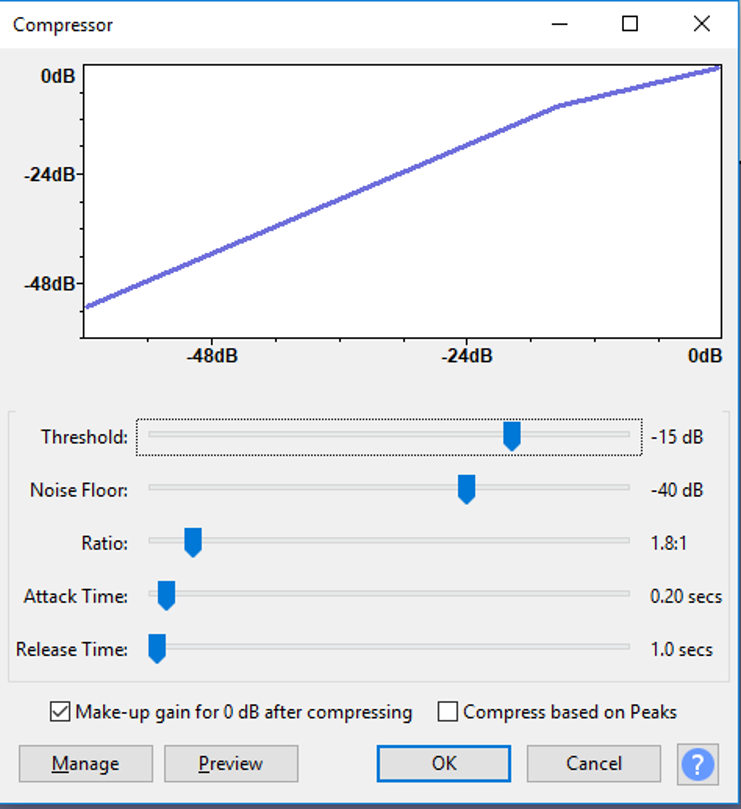
Set the threshold to be just before your decent-sounding part, so it’s barely affecting that. The defaults for the other settings should basically be fine. You can un-check the make-up gain if you want a better before/after sense of what it is doing, as you trial-and-error into something that sounds good. Compression is so important for human voice.
Step 8 – Equalization #
Select all and go Effects>Equalization, (Effects>Filter EQ in 2.3.3 and newer) and then look at some of the preset curves. Bass Cut, Treble Cut, Walkie-talkie. We want to cut out the extremes of our bass and the extremes of our high-frequency signals, without affecting the recording proper. This is basically another form of noise reduction, we are getting rid of frequencies outside the range of human voice.
So draw, or select “Graphic” and use the sliders, some drops in the curve at the extremes edges, then select preview to make sure you aren’t doing any damage to the recording. It’s easy to do this “too far”, and if we do it right, the voice shouldn’t sound different. So… go easy. You don’t need to drop frequeneces to NOTHING, just dim them down.
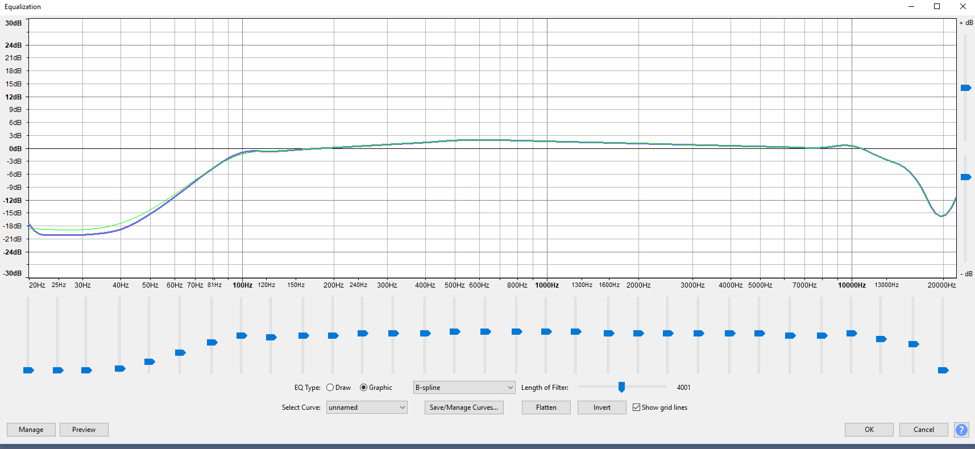 (This is probably too aggressive as an example, especially In the highs)
Step 9 – Fade in/out #
Select the very edges of our clip – this can even be fractions of fractions of a second – and fade them in/out appropriately. This will prevent a click noise when the audio starts and stops, which is important for us. A longer fade can also help make noise less jarring when i t suddenly appears. Noise fading in while someone starts talking can go almost entirely unnoticed.
Step 10 – Review #
Use headphones and give the audio file a good listen. Good? Very good? You sure? Sleep on it.
Step 11 – Export #
Export as a .WAV. 16-bit is fine. Unity will make the file size smaller (file-size compression) for us, so we can give it large, “lossless” files. You can ignore the metadata pop-up.