Capture & Documentation Tools #
Ways to capture content that is on your computer, from your computer.
Screen Images #
- Print Screen button (“Prt Scn”). Literally on your keyboard, near the top right of most keyboards, sometimes on a function layer. Pressing it will save an image of the entire contents of the displays to your clipboard. Go into MSPaint (or such) and hit paste (ctrl+v) the capture in. Crop as needed.
- Snipping Tool (Windows). Hit Win+Shift+S to open the Snipping Tool, which lets you draw and capture rectangular sections of the screen.
- MacOS has the shortcuts Cmd+Shift+3 and Cmd+Shift+4 that will let you capture the entire desktop or rectangular regions, which are then immediately saved to your desktop.
I recommend bringing images into a photo editing software like Photoshop to crop them to a regular aspect ratio.
Screen Gifs #
- LiceCap (Open Source, Windows+Mac)
- Screen-To-Gif (Open source, Windows/Mac/Linux)
- Gifcap (Open source, Web-based on modern browsers)
Video Capture with OBS #
For capturing video from the desktop, the best piece of software to learn is OBS. It’s more powerful than we may need, but it remains easy to use and an indispensible tool in the digital media field.
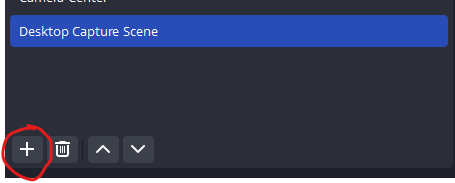
Create a new Scene. #
The Scenes panel is in the bottom left of the interface. Click this plus button to add a new scene. Scenes are saved, so you don’t have to add your scenes every time you launch OBS.
 .
.
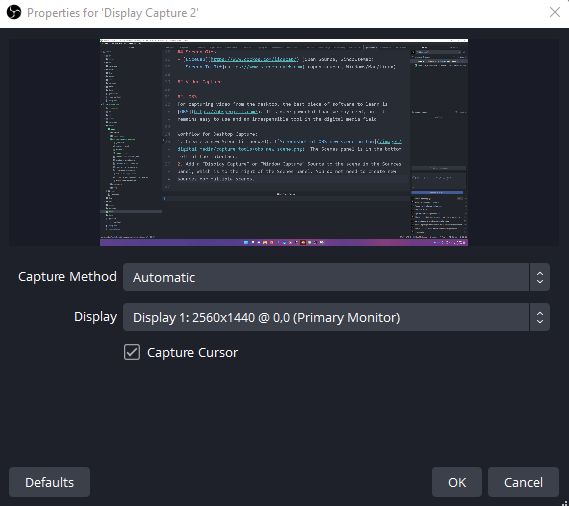
Add Sources. #
Add a “Display Capture” or “Window Capture” Source to the scene in the Sources panel, which is to the right of the Scenes panel. You do not need to create new sources for multiple scenes.
 .
.
Crop and Align. #
You may wish to add a “Crop/Pad” filter to the display capture source. Select a source, then click ‘Filters’ for a popup window worth exploring and experimenting with.  . This gif was created with LiceCap.
If your desktop is not the same resolution as your ouput (for example, I have 1440p monitors but export 1080p video), you may need to select the video by clicking on it in the preview window. Drag the red handles to resize the video to fit the window as you see fit. It can snap to corners precisely.
Add Audio #
If needed, add an Audio source. The process is the same as adding the display capture source.
To capture your computer audio, choose the “Audio Output Capture” source and adjust the settings appropriately, usually to match the speakers that you are using. Check in the Audio Mixer that audio is coming in when it should be.
Review Settings #
Go to Settings (button in bottom right). In the Settings menu, choose the Output section. The defaults should be fine, but take note of the Recording Path, and change this folder to somewhere else, if you choose.
Record #
Hit “Start Recording” and record your capture. I recommend more smaller takes, so each recording file is a single ‘performance’. This makes it easier to delete bad takes and save space.
Remux/Convert #
Next, lets convert the MKV video file. MKV takes a lot of space but is less computationally demanding to record to, and convert it to an MP4 file, which compressed better, is widely supported, but is computationally more expensive to record to. OBS calls this process “Remux-ing”, but it’s also called “Converting” or “Reencoding”. Go to File > Remux Recordings. Select the recording on the left, and hit “Remux”. Even for longer recordings this process is pretty quick.
 .
.
This creates a new file, it does not modify your original file.
You can also convert files with “Adobe Media Encoder”, if you have the adobe suite, or the indespensible command-line software ‘ffmpeg’.
Trim #
Lastly, we want to Trim our video to exclude any parts we don’t want to use. While I recommend DaVinci Resolve as a fully-featured and free-to-use video editor, a simple ‘Trim’ operation does not require such sophisticated software.
In Windows 10 or 11, right click on the MP4 file in explorer, and choose Open With… “Photos”. With the “Photos” microsoft-included-with-windows software, we can trim the video. Select the “Trim Video” option in the top bar, circled in red.

Move the timeline sliders to set new start and end points and then click “Save A Copy” to save the trimmed video.
In the video editing world, start and end positions when trimming a video are called “In” and “Out” points.
In Mac, you can open the file in the QuickTime player application, and choose Edit > Trim.
Unity Recorder #
Unity Recorder is a tool that quickly lets you record videos right out of Unity’s play mode. It’s a package that does not come included with Unity by default, but is easily added via the package manager.
See the Unity Recorder manual here, or this Unity Learn guide that walks you through setup set by step.