Unity has multiple Input Systems, which is confusing for beginners. Built into Unity by default is access to the “old” input system, which this page will detail. The “old” system is simpler and easier to use for beginners. Unity also has a “new” input system that you can switch to, which is far more advanced and capable, but requires a bit of setup before you can use, and utilizes more advanced c# features.
In “real” projects, particularly those targeting multiple platforms, multiple devices, and for VR, I much prefer the “new” input system. The “old” system is much faster to get started with.
Input Systems #
An input system handles one of the hardest parts of game development: Supporting multiple devices. The input that comes from devices into your game can come from a near infinite incredible number of sources:
- Keyboards (of various types, of various layouts, with regional differences)
- Mice events (that may or may not have various buttons)
- Audio Devices
- Gamepads (from microsoft, sony, logitech, and others which all behave slightly differently)
- Joysticks/Flight Control Devices
- Racing Sim Devices (wheels, pedals)
- Accelerometer Information in Phones
- Multi-touch supporting screens
- GPS coordinates
- VR Input Devices (Including arbitrary tracking pucks)
- Alt-controller input Systems (wiimote, donkey-kong bongos, TV blaster guns)
- Musical Instruments
- Fake Musical Instruments (rock band/guitar hero)
- MIDI devices
Many of these devices “pretend” to be other devices (often behaving like an xbox controller), which can help or hurt us in variety of contexts.
An Input System takes all of these real-world devices and maps their inputs into one or more fake virtual devices or fake virtual inputs. The fake inputs by different names in different input systems. The old system calls them “axis” and “buttons”, the new system calls them “actions”. Our code can look at the fake virtual devices as if they are real. Fake-Input device says jump? Jump. It doesn’t need to know if you pressed the space key on your keyboard or the x button on your gamepad.
The input system handles all of the real-world complexity of devices, and allows our code to pretend that the world of devices isn’t actually complicated (it is), and it can receive nice clean input events and statuses.
Using The Old Input System #
In Unity, we use the Input class. Simply type “Input.” in our code to access all sorts of functions. The most common are “GetAxis” and “GetButton”.
You almost always want to capture player input inside of the Update function.
Do not capture input inside of FixedUpdate - your input will be broken. What’s worse, it will be broken in an inconsistent and hard to debug way.
Axis and Buttons #
Every input one our fake input device is given a name. We don’t need to name our input “space”, we can call it something useful and descriptive, like “Jump” or “Shoot”. It can be either an Axis, which will return a value between -1 and 1, or a button, which can either be pressed (true) or unpressed (false). A joystick is two axis, a horizontal one and a vertical one: mapped to pushing left/right and up/down with the joystick. If the joystick is “centered” and not being touched, both the horizontal and vertical axis will be 0. If I hold down on the joystick, the vertical axis will be -1 and the horizontal axis will be 0. If I push to the right, the horizontal axis will be 1 and the vertical axis will be 0.
Unity, by default, sets up two axis, named “Horizontal” and “Vertical”. It is mapped to the left stick of a gamepad, the arrow keys of a keyboard, and the WASD keys of a keyboard.
Buttons are like axis but simpler, they can be pressed or not pressed. Unity sets up one called “Jump” that is mapped to the space bar of the keyboard and the “south” button of gamepads.
Reading State vs Events #
It’s important to remember that, with the ‘old’ system we are generally reading values continuously, and not responding to “events”. We are looking at a variable’s value every frame, and if that value is something we care about, or past a certain threshold, we THEN can call a function or even fire off an ’event’ ourselves.
The plan, now, becomes to look at all the input values we care about every single frame we care about them. ie: in the Update loop.
Remember we are using a game loop. During every loop, our input is set to whatever state was read from the devices by the input system. Input won’t change for any given frame of Update. Luckily, our games update loop is fast enough that input feels very responsive and fluid - the update loops is usually faster than the frame-rate of the monitor your are looking at a game on, so your game can visually respond to input within a 60th or 144th of a second.
When you push a button, its probably true for a number of frames in the game, not just ‘one’ frame.
GetAxis #
To get the value of an axis, the code might like this:
void Update()
{
    //See below note on GetAxis vs. GetAxisRaw before using this code.
    float horizontal = Input.GetAxis("Horizontal");
    if(horizontal > 0.1)
    {
        //pushing to the right
    }
    else if(horizontal < -0.1)
    {
        //pushing to the left
    }
}
We might want to combine the input into a Vector2.
void Update()
{
    float horizontal = Input.GetAxis("Horizontal");
    float vertical = Input.GetAxis("Vertical");
    Vector2 inputDir = new Vector2(horizontal, vertical);

    //We can do the above three lines of code in one line of code:
    Vector2 inputDir = new Vector2(Input.GetAxis("Horizontal"), Input.GetAxis("Vertical"));

}GetButton #
Get button is just one of three useful functions. They are GetButton, GetButtonDown, and GetButtonUp. All of these functions will return a boolean - true or false - for any given button name.
GetButton will return true when a button is pressed, and false when it is not pressed.
GetButtonDown will return true for the first frame a button is pressed. It will then read as false until the button is released and pressed again.
GetButtonUp will return false until the the first frame a button is released. It will then read as false until the button is pressed and released again.
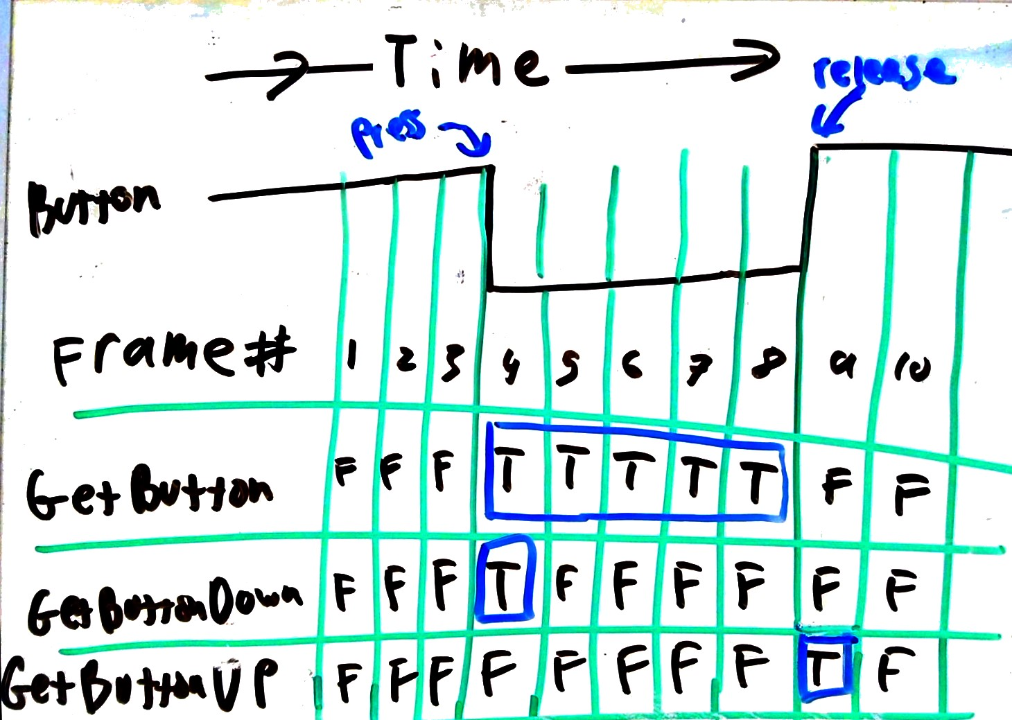 Pardon my whiteboard scratchings.
Here, the x-axis of the chart is time, each column being a new Update loop. T and F are if the function will return True or False, and the line to the right of button is like a side-view of the buttons height, either up or pressed down.
void Update()
{
    if(Input.GetButtonDown("Jump"))
    {
        Jump();
    }
}
void Jump()
{
    //code to jump here
}
Input Isolation In Code #
Note in the example above that I created a Jump() function. It’s a good idea to keep the code that reacts to input, and the code that examines for input, in two separate, compartmentalized places. I almost always put “PlayerInput” on a unique script from, say, “PlayerMovement”. This way I can rewrite or change my input handling (a common and messy task) without messing up any of the logic of my game. The above example is simply moving the logic to a new function - not a new monoBehavior - but it’s still a smart thing to do.
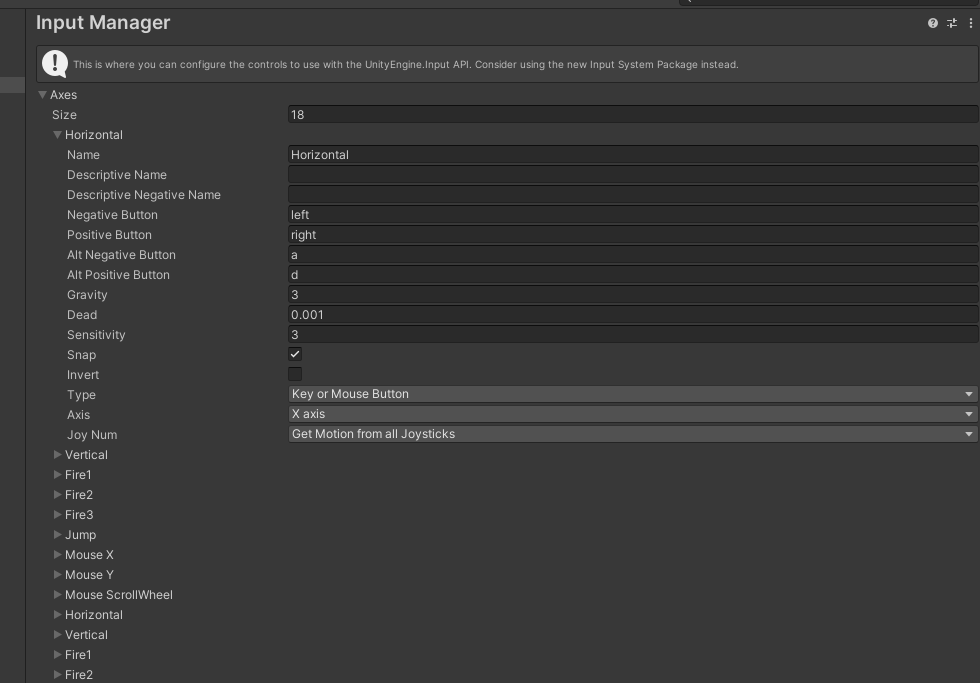
Editing The Input Axis #
Editing the input axis is simple: Go to Edit > Project Settings… and choose ‘Input Manager’. See the Unity Documentation Page for details.
GetAxis vs. GetAxisRaw #
If you are using two-directional keyboard input, you have likely noticed that your game might feel sluggish or behave oddly. Perhaps you tried the following type of setup:
void Update()
{
    if(Input.GetAxis("Horizontal") > 0)
    {
        //move right
    }
    else if(Input.GetAxis("Horizontal") < 0)
    {
        //move left
    }
}
The problem isn’t with our code (although, to note, we still may want to change 0 to small numbers as a ‘deadzone’).
The real problem is with how Unity treats axis. If the input that Unity reads jumps from a value to 0, Unity wont have the value jump to 0, instead it fades back. It does this when handling keyboard input as axis input. Unity is, to some degree, simulating a joystick, and simulating the amount of time it takes for the joystick to move from the edge back to the center.
When using keyboard input, this may or may not be what we want. In some types of movement, we like it. In other types, it just gets in our way. To avoid it, use the “GetAxisRaw” function instead of “GetAxis”.
Some online resources will tell you to just set the gravity or snap settings in the input manager really high, so it falls back to 0 quickly. And, sure, that would work. But it’s a silly way to solve a straightforward problem. Instead of changing the parameters of the smoothing filter to make it negligible (in what we hope is all conditions), lets actually just turn it off.
void Update()
{
    //GetAxisRaw would appropriately handle keyboard input in this situation.
    if(Input.GetAxisRaw("Horizontal") > 0)
    {
        //move right
    }
    else if(Input.GetAxisRaw("Horizontal") < 0)
    {
        //move left
    }
}