Installing Unity - A Thorough Guide #
Unity is a large and complicated piece of software. This document is thorough, if you just want to get started, you can find more concise explainers elsewhere. I don’t recommend that - You will need to know all of the ins-and-outs of setting up a development environment, especially when troubleshooting.
To develop games in Unity, you need to do the following:
- Create a Unity Account
- Install the Unity Hub
- Activate a license for Unity (this is free)
- Install a version of Unity via the Hub
- Install an IDE (A fancy text editor)
- Tell Unity to use your IDE
The Unity Hub manages installing other versions of Unity for us. We install Unity via the Unity Hub. We do this because it’s likely that you will have multiple projects that are in different versions of Unity, as it’s considered bad practice to upgrade Unity during a projects development.
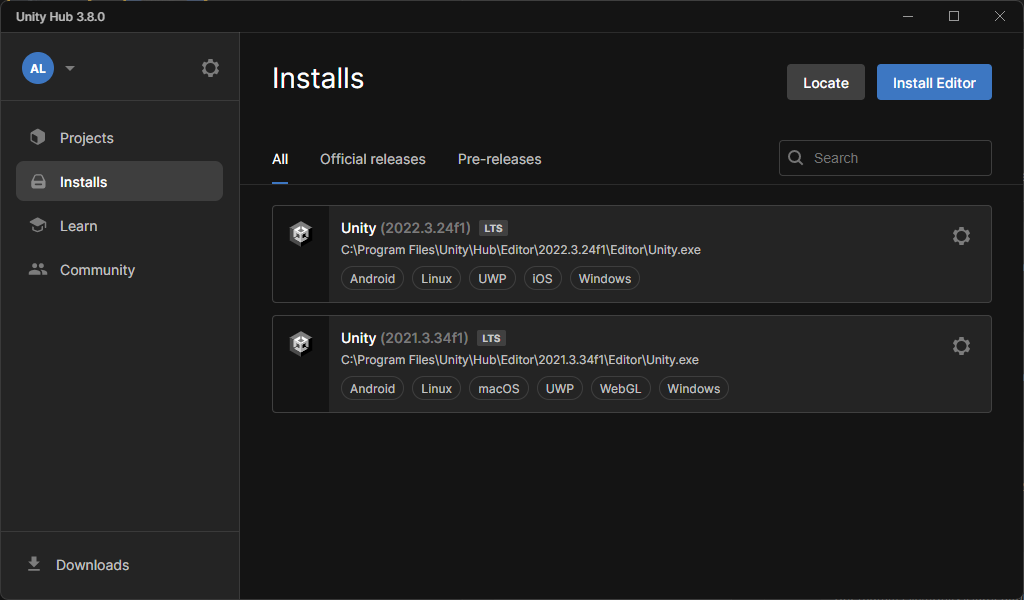 Unity Hub with 4 versions of Unity installed.
Create a Unity Account #
First, create a Unity account at https://unity.com/.
Students do not need to use their school account, you may make purchases with the account that you want to keep after you lose access to the school email. That said, you can change it later.
Students should, however, sign up for Unity Student, which will give them access to some professional tools like Cloud Build, more storage space on Collab, free assets, and more. You can do this even if you do not use a school email address, being verified as a student is a separate process.
Installing Unity Hub #
Next, download and install the Unity Hub from the unity Downloads page. You do not need to be logged in on the website.
Next, you need to log into your account inside of Unity Hub.
Activating A License #
Because Unity has paid features, it has a license system that must be active in order to use it. Unity is still free to use! But we need a free (“personal use”) license to use it. We need to activate a new free license for the machine. This gives us all of the features of the unity editor (even the dark theme). Don’t worry, you aren’t missing out on the Unity experience: most of the paid features are related to unity cloud services or targeted towards large studios. They generally don’t affect the workflow of a single user.
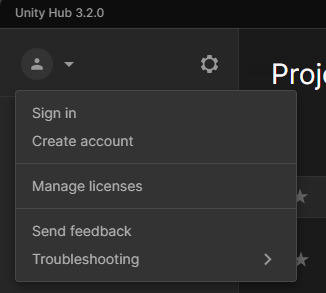
To activate a license, click on the user icon on the top left, click manage licenses, then “Add” or “Activate new license”.
In the “Add New License” screen, you can choose “Get a free personal license” or “Unity Personal”. If you don’t know, you do not use Unity in a professional capacity.
Leave the preferences page with the arrow icon in the top left.
Installing Unity #
Click on the Installs button, then click Add. A pop-up appears asking you which version you want to add. Choose a version (read below for info), then click next. Choose the modules (again, detailed below), and click done. Unity will start installing.
How Unity Versions Work #
Unity has many engineers working on different features and systems all at the same time. You can read about many different goals that the Unity team has on their product roadmap. Many of then rely on other systems to work, and Unity is prone to bugs where on part of it updates when another doesn’t. Because of this, Unity has a fairly complex versioning system to make sure everything runs smoothly. Understanding at least a high-level overview of this is important.
Externally, Unity releases new features in beta versions of the editor that allow the public to test, and complain give feedback about the software, and Unity can get a lot of bugs and UX issues fixed before the feature is added to the version most people are using.
It has two ways to have it’s internals updated: The official Unity version, and packages, which can be installed and updated independently. We will cover packages later, let’s just focus on the official unity version - the core unity software.
For any version of Unity, it goes through 4 different stages of being publicly released:
- Alpha
- Beta
- Official
- Long-Term Stable
First as an alpha, then beta, where the public is invited to try out new features and report bugs. We won’t be using these versions.
Next, there are 3 official releases every year. They are released on a calendar cycle, so the releases are named in YYYY.N format. 2020.1, 2020.2, 2020.3.
The first two releases (.1 and .2) are called “tech” releases. They introduce new features. The last release (.3) is called the Long-Term Stable (LTS) release. It introduces no new features. It is supported with bug fixes for two years. If you are using a tech release, it is assumed you will eventually switch to the LTS version of those tech releases in the future.
Unity switched from 3 tech releases to 2 in 2020, so 2019.4 (LTS) exists. They also switched from a traditional numbering scheme around 2017, so if you see unity version “5.6”, or similar, that’s basically the 2016/2017 version of Unity.
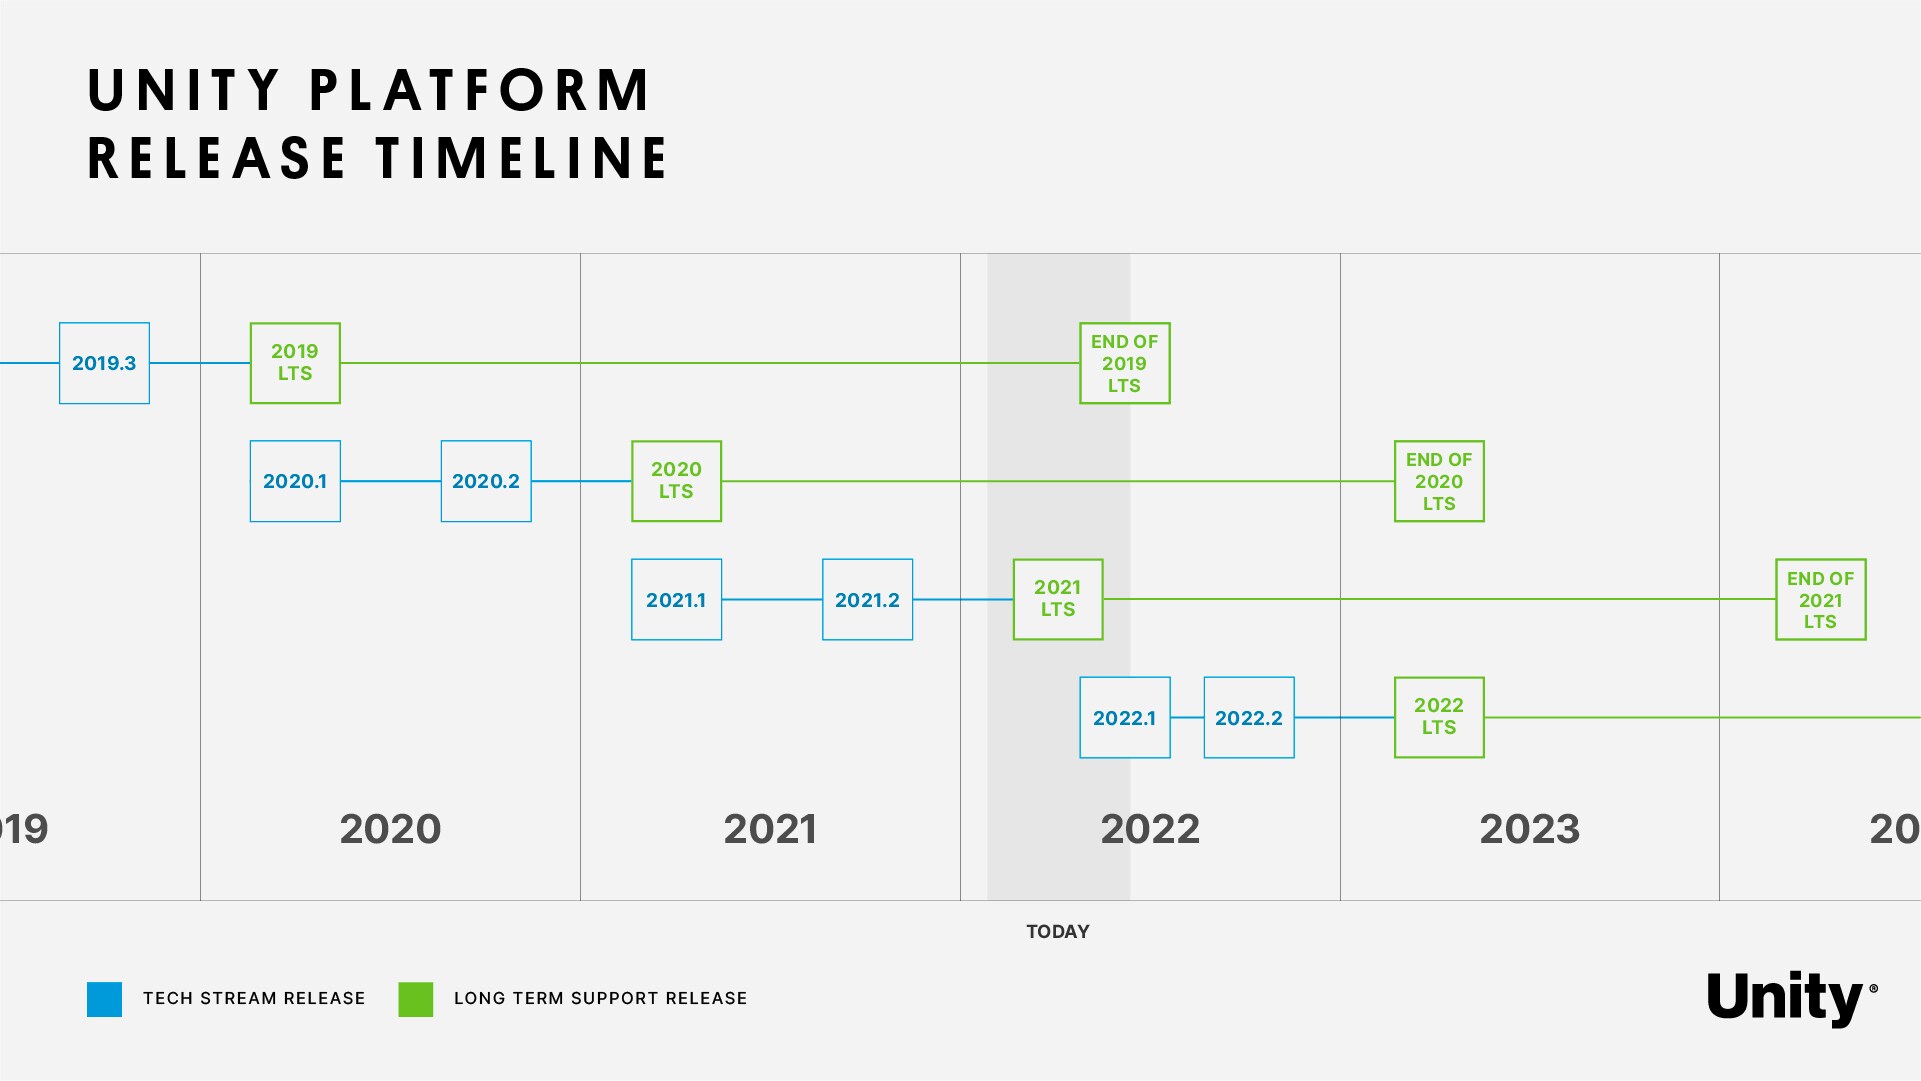 Timeline Image from the Unity Blog.
Which Version of Unity Do I Install? #
Unity recommends it’s LTS release, (At the time of updating, it is currently 2021.3). I agree, the current LTS version is probably the one you want to install.
This guide alternates between recommending tech releases or not. Because we are focused on VR development, we are often eager for new features and support. At the time of writing, I think the LTS version is the way to go, but don’t be afraid to switch to another version. Unity often posts about interesting new features on it’s blog.
Platform Modules #
After you choose the version, click next, and you will be asked when modules you want to install.
Modules are external libraries that allow you to export or publish your game to different operating systems. Mac can’t publish a file that will run on windows by default, one needs to install a Mac build support (Mono) in order to do that. Most of the different platforms are pretty large, so you should only install the ones you need. They eat up file space fast.
Installing Modules After The Fact #
In the Unity Hub, you can always go back to the installs page, click the three vertical dots next to any version of Unity, then choose ‘add modules’.
Microsoft Visual Studio #
Unity lets you install an IDE right from this window, and leaves it checked by default so that people who don’t know what they are doing won’t be confused when they just click through and try to get started.
I recommend JetBrains Rider over Microsoft Visual Studio, and ask my students to use Rider. If you are one of my students, please uncheck this box to save yourself some file space on your computer. Otherwise, read below to learn about some of the differences between IDE’s.
If you have the file space, Microsoft Visual Studio won’t hurt to have around. At the very least, it can help setup development environments.
Oculus Quest #
For Oculus Quest development, be sure to select Android Build Support (and both sub checkboxes: SDK & NDK, and OpenJDK, unless you know what those are and know you already have them somewhere).
Android build support takes up a lot of space, and you can always install them alter, so you may wish to wait.
Mono or IL2CPP? #
The short answer is Mono. IL2CPP stands for “Intermediate Language to C++”, and it’s an alternative scripting backend. The non-technical difference is that IL2CPP can improve performance, but has larger build times and file sizes. I recommend you default to Mono, and the curious can read more.
WebGL #
I love WebGL development. It’s like the old days of Flash games. It allows you to publish games to Itch.io, simmer.io, or other online places. Sharing something you made with a simple link to a webpage really reduces the barrier to getting others to play your games, and I recommend developing little 2D games for the web and sharing them with your friends. There are lots of wonderful online communities around making little games, and lots of online and offline “game jam” communities that get together on teams and work on games in short periods of time. It’s a great way to get out there, make friends. WebGL is almost never a requirement, but it makes sharing ones work simple, easy, and fun.
Documentation #
Always leave the checkbox for documentation checked.
Once Unity is installed, we can install an IDE.
If you are not planning on programming in C# with Unity, you can stop here - but I still recommend reading the rest of this guide.
Integrated Development Environment (IDE) #
IDE’s are very fancy text-editors. When we write code in Unity, all Unity really cares about is the text files that will make up our scripts. We can use even the most basic text-editor to write our code - notepad.exe or TextMate. This is a terrible idea. There are tons of features that IDE’s provide, like line numbers, syntax highlighting, error highlighting, autocompletion, and more. In order for these advanced features to exist, the text editor needs to know about your code, and about the language you are programming in. That’s where the “integrated” part of IDE comes in.
Choosing an IDE #
You can use any IDE you want. Some of the most popular IDE’s for Unity are:
- Microsoft Visual Studio
- VSCode
- Jetbrains Rider (My recommendation)
I highly recommend Jetbrains Rider. It’s paid, but free for students. It’s Unity support and Unity-specific features are excellent. If you are a student in one of my classes, I am asking you to use Rider.
Microsoft Visual Studio #
Unity gave you the option to install Microsoft Visual Studio Community, which is a perfectly fine IDE. It’s a fully-featured and professional level IDE that has been used in the industry for years. It’s a fine option - it’s free to use, but you have to log in with a Microsoft account. You can install it via the Unity modules, or you can download it here
VSCode #
The VS in VS Code stands for Visual Studio, and it’s made by Microsoft. It’s Microsoft’s visual studio code. But it’s not Microsoft Visual Studio. Confused? We always say “visual studio” for the big software, and “Vee Ess Code” for the lightweight, open source, plugin-friendly software. VSCode is part of a modern emergence of lightweight-but-plugin-rich text editors like Sublime Text and Atom. Note: I just learned when updating this guide for Fall 2022 that GitHub is sunsetting Atom, so don’t choose that one.
Avoid arguments about the best text editor, in general. VSCode vs. Atom vs. Notepad++ vs. Sublime text? Who cares, use whatever you like. But since you are on my website, here is my take: all of the above. I find it convenient to compartmentalize different tasks to different software, so I don’t have to deal with configuration as much. I have VSCode set up for C development, Atom nicely configured for Markdown (I’m writing this in it right now), and notepad++ for poking around at things. I tend to prefer the larger “heavyweight” software like visual studio or JetBrains products. I could configure VSCode to have almost all the quality-of-life features I like about JetBrains Rider, but who has the time?
Read about setting up VSCode with Unity here: https://code.visualstudio.com/docs/other/unity.
If you do install VSCode, please follow that page carefully. Countless times students skipped over the step where they had to install the .NET framework before using VSCode. Frameworks get installed automatically when using Rider or Microsoft Visual Studio, but not for VSCode.
JetBrains Rider #
JetBrains makes a number of powerful IDEs for different languages, and Rider is their IDE for .NET (C#) development. It has an incredible amount of Unity-specific features built into it, and has the best out-of-the-box support for code generation and auto-complete for Unity, in my opinion. One of the biggest features is that it knows about Unity’s documentation, and you can select some unity function and open the documentation for it directly from Rider. I could keep gushing over how much I love it, but you can just read about it’s Unity features here and read a biased comparison here.
There is a catch. The biggest downside is that Rider is paid software. Luckily, it has a free educational license. Sign up for an account, and apply for the educational license here. When you launch Rider, you will be asked to use a trial or activate a license. Once you have the educational license, choose to activate by account, and log in.
If you are a student in one of my classes, I politely request that you choose the “IntelliJ” keymap when installing. This is so that your keyboard shortcuts match my keyboard shortcuts, and life is just that much easier when I am explaining how to use the software.
Telling Unity what your IDE is #
Once you are in Unity - after you create your first project, and so on, you will want to go to the Preferences (Edit>Preferences…) and go to the “External Tools” menu. In the drop-down next to “External Script Editor” you should see an option to select your editor of choice (i.e.: Rider).
It’s important to set this option, as it installs some internal features to Unity that makes sure that the project (the ‘solution’) is correctly opened in the IDE when you double-click on a file, and that when you click on an error message, it can open the IDE and put your cursor directly on the line of code causing the error.
Done #
That’s it. Most of these steps do not need to be repeated when installing other versions of Unity. Your IDE, Unity Hub, and your Unity License are all good-to-go for the computer you got set up on.