Unity Builds #
Scene Information #
Unity supports a number of ‘Build Targets’, or platforms that it can create executable files for. Desktop software for Windows, Mac, and Linux - of course, but also mobile platforms like Android and iOS, WebGL targets for playing games in the web browser on sites like itch.io, and game consoles like the Xbox or the Playstation .
I will use the terms ‘Build Target’ and ‘Platform’ interchangeably on this page.
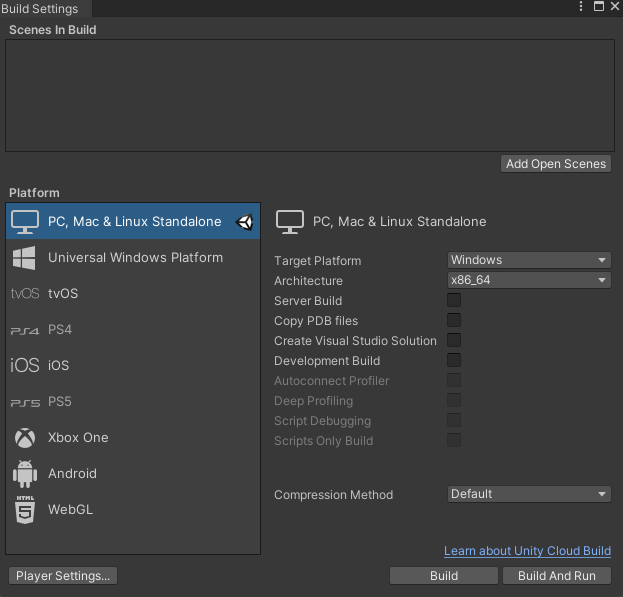
The empty rectangle at the top is a list of all of the scenes that will be included in the build. If your scene isn’t in this list, Unity will exclude it, and you can’t load it. Unity will also do it’s best to only include necessary assets in your project, and it uses the scene list to figure out what it does and doesn’t need.
Here is a full build scenes list for an actual game:
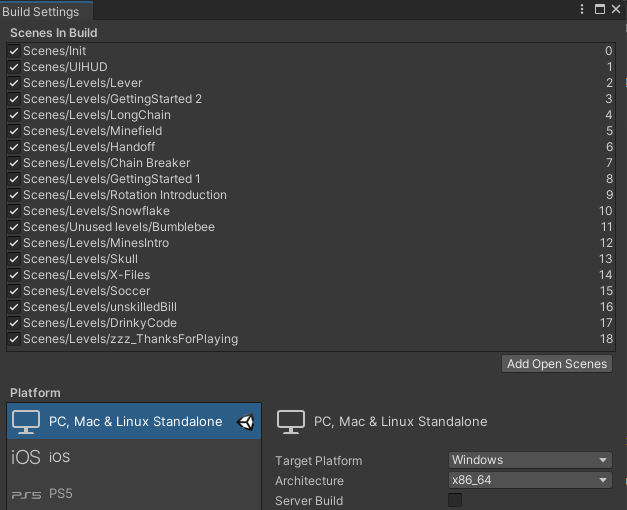
On the right, you can see the ‘build index’ of each scene, and reorder the scenes. The scene at the top of the list - build index 0 - will be the first scene to be loaded when the project launches. After that, it’s up to you to switch scenes and do what you need to do to play the game.
Unity can load multiple scenes at a time. In the above example, the game first loads the “init” scene, which is a small scene that is in charge of loading all of the other scenes. This game has no main menu, the Init scene simply additively loads the UIHUD scene and the first scene of the game. At the end of each level, it unloads the level and loads the next one.
This empty “init” manager scene is a common design pattern in Unity development.
Switching Platforms #
Unity needs to know what platform it is targeting while working internally. While you can build to multiple platforms, and switch at any time, the currently selected build target will determine how Unity imports assets. For example, Windows builds, Unity internally converts audio files to a .wav format, while on Android it uses .ogg.
When you switch targets, Unity will need to reimport every single asset in your project. For large projects, this can take a long time. It’s generally always best to have the appropriate build target selected, and switch to it early on in development.
You can always test your app in play mode no matter what your build target is.
You switch from the Build Settings menu, simply select the appropriate target and click ‘Switch Platform’
Adding Build Targets #
By default, Unity only supports building an executable file for the same operating system it is installed on. This is because they take up a lot of file space, and are often not needed. In order to build for other operating systems (building for windows from a mac computer, or vise-versa), we need to add more build targets.
We add a build target from the Unity Hub. Close any open Unity projects, and go to the Installs section of the Hub. Click the three dots next to the appropriate unity version, and select ‘add modules’.
You can see what build targets are installed via icons in the Hub.
If you don’t know better, choose the “Mono” versions instead of “IL2CPP”. For the curious, you can read more about IL2CPP from the Unity documentation.
Android Information
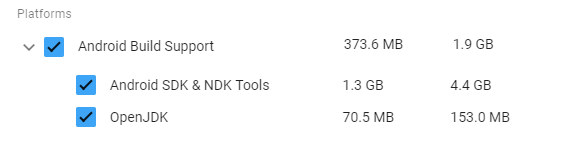
For Android, you want to be sure to include the checkboxes for SDK, NDK, and JDK tools. These are necessary for android to work, and Unity can download and install them automatically.
If you have done android development with other IDEs (like Android Studio or Unreal Engine), you already have the SDK, NDK, and JDK downloaded on your computer somewhere. If this is the case, you can uncheck these sub-check boxes, and not bother downloading it again, but leave ‘Android Build Support’ Checked.
You can set the locations of these tools manually in Unity (not the Unity Hub). Go to Preferences… > External Tools.
Android takes a really long time to build on it’s first android build. They cache a lot of the system information, so after the first one, builds go much faster. I tend to do a first android build before going and getting coffee, just to get it out of the way.
Windows Executable Information
When you make a build for windows, Unity will prompt you to select a folder. It’s standard practice to create a ‘Builds’ folder in your project, and then a folder for each build in this folder.
Name the folder something appropriate (its smart to number or date your builds, so you never mess up and grab an out-of-date version).

Unity creates the .exe file, a standalone file. This means we don’t have to install the app. All of the information it needs to run is here. It also means you can’t just send someone the .exe file. We need to have all of the files - the gameName_data folder, the MonoBleedingEdge folder, and UnityPlayer.dll.
If any of these files or folders are missing, the game will throw an error.
Further, the .exe filename and the _Data folder name need to match. If you rename one, you have to rename the other too. The executable file looks at its own name and searches for that+ “_Data” for a folder full of important game data.
When sending this file to someone, or uploading to a site like itch.io, its best to put all the files in a compressed (zip) folder.
macOS Executable Information
On the build settings menu, there is an"Architecture" drop-down. Choose between Intel, Apple silicon, or ‘both’. If you don’t know better, select both. This creates a much larger file size than just selecting one or the other, so if you do know the architecture is running (apple silicon includes apple “M1” devices), you should select it. You can also make multiple builds. If you are hosting your game online for someone to download, you can let them choose the appropriate version for them.
Mac creates a .app file. This single file is everything the game needs to run, no extra folders to worry about including.
For someone to run the game, and you aren’t worrying about code signing or notarization, they may need to “Allow apps downloaded from anywhere” in their security and privacy settings. Read more about apple’s security practices from apple support.
webGL Information
When choosing WebGL, there are differences in performance between Unity versions, as Unity improves it’s webGL build process over time.
WebGL Builds give you an index.html file, plus some other files, that you can directly open in a web browser. The catch is that you need a web server to run, so opening the file on your computer or sending them to a friend won’t run the game. The two options are to spin up a local webserver (Unity does this when you hit ‘build & run’ from Unity), or to upload the game to a hosting service that can provide a webserver. Itch.io, simmer.io, and Unity’s own Unity Play are three decent options. They have their own gotchas and catches.
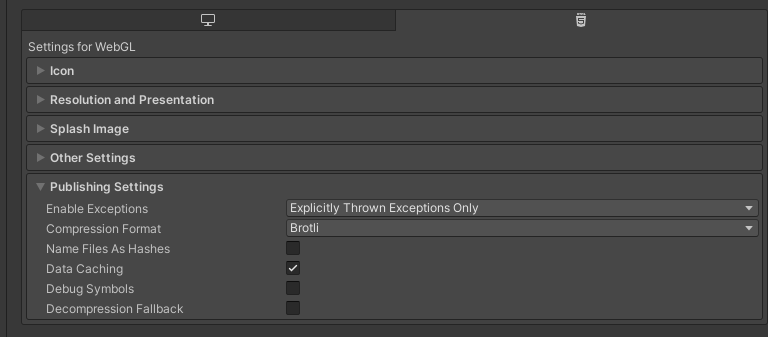
Sometimes, you get an error like “unable to decompress” or “unable to load” or it’s just black, or just loads forever. This is usually caused by the web server not supporting the compression method you use.
You may need to check Decompression Fallback (Project Settings > Player > Publishing Settings) depending on the service you upload the files to or the version of Unity you are using. I have also, in some cases, found success by switching from brotli to gzip to compression, or vise-versa. The details of this is well out of scope of this guide, but keep these player settings at the top of your mind as you trial-and-error troubleshoot.