Communicating from Arduino Devices into Unity
Overview
Arduino is a great group of microcontrollers that allow users to collect several data inputs. They can be used to make controllers, art, immersive experiences, and more! This post will demonstrate a few ways to get Arduino serial-data or keyboard inputs into the Unity game engine.
Note: Some microcontrollers can act as HID (Human Interface Device) and can use the keyboard library to emulate a keyboard.
The two strategies are Keyboard Emulation and direct Serial communication. Keyboard emulation is easier to setup from thee receiving end (e.g. Unity), and Serial is easier to setup on the Arduino end.
Keyboard Emulation Controller
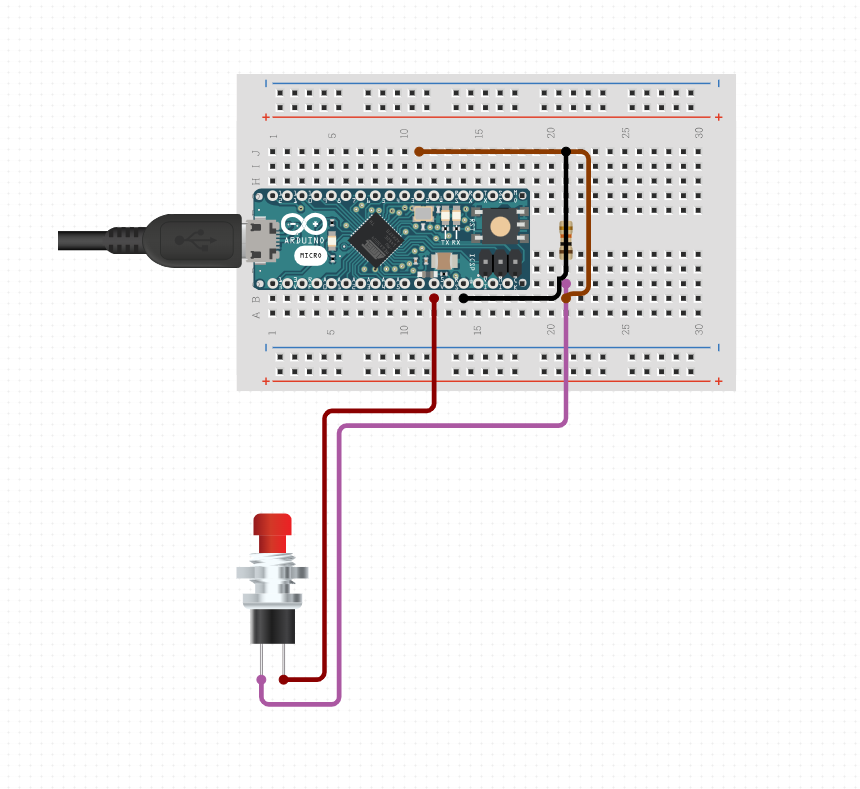
One simple way to communicate to Unity is for the Arduino to pretend to be a USB keyboard (HID Device). This requires no additional setup on the Unity (or whatever tool/game engine) side of things, which is the primary advantage.
If your Arduino is not on the list for Keyboard Library, you can instead use serial data to communicate directly.
The Arduino Uno, one of the most popular arduino models, does not support acting as a keyboard.
If you want to use keyboard inputs here is a list of Compatible Microcontrollers.
The Plan
- Connect buttons or other input devices to the Arduino, read the data from the world. This guide will not cover this part.
- Use the Keyboard library to send keystrokes to the computer.
Arduino Code:
#include <Keyboard.h>

// Simple example a string output

void setup() {

  Keyboard.begin(); }

void loop() {
  if(weWantToSendAKeystroke){
    // Send 'W' key to the computer
    Keyboard.write('W');
  }

  delay(100);
}
Unity Code:
Unity views the input from the Arduino as it would any other keyboard. For example, if a button tied to the W key press is supposed to move you forward in game, then all you need to do is write a script in Unity to accomplish that.
using UnityEngine;
public class Movement : MonoBehaviour
{
    public float speed = 5.0f;
    void Update()
    {
        if (Input.GetKey(KeyCode.W))
        // If W is pressed
        {
            Vector3 movement = Vector3.forward;
            transform.Translate(movement * speed * Time.deltaTime);
            // Move forward
        }
    }
}
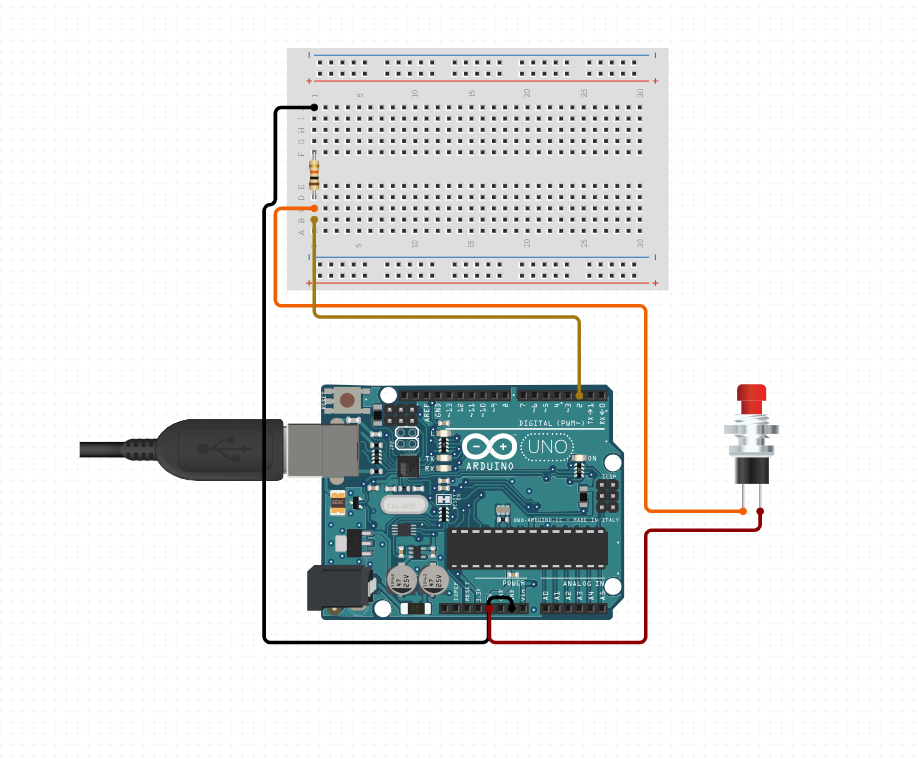
Serial Data Controller
Another option is to directly communicate between the microcontroller and the game engine. This can be done through a number of protocols:
- Serial
- TCP/UDP
- OSC
We will use serial, as it is the easiest to setup on the Unity side.
Arduino Code:
void setup() {

  Serial.begin(9600);

}

void loop() {

  Serial.println("MOVE_RIGHT");

  delay(100);

}
Unity Code:
- Read data from the serial port and execute corresponding actions. You must make sure your project can support the serial port data, follow these steps:
1) Change API Compatibility Level:
In player settings (edit > project settings > player)
In the Other Settings section, find Configuration and change the Api Compatibility Level to .NET Framework.
2) Add .NET SerialPort Library:
Unity does not include the System.IO.Ports library by default. It needs to be added manually.
Download the System.IO.Ports library. You can find it as part of the .NET Framework or as a separate NuGet package. For Unity, the easiest way is to use the System.IO.Ports.dll from the .NET Framework.
Once you have the System.IO.Ports.dll, place it in the Assets/Plugins folder of your Unity project. If the Plugins folder does not exist, create it. If using JetBrains Rider, you can install it via the NuGet manager window with the project open.
using UnityEngine;

using System.IO.Ports;

public class SerialMovement : MonoBehaviour

{
    SerialPort sp = new SerialPort("COM3", 9600);
    // Specify the correct COM port

    public float speed = 5.0f;

    void Start()
    {
        sp.Open();
        sp.ReadTimeout = 1;

    }
    void Update()
    {
        if (sp.IsOpen)
        {
            try
            {
                string data = sp.ReadLine();
                if (data.Contains("MOVE_RIGHT"))
                {
                    Vector3 movement = new Vector3(1, 0, 0);
                    transform.Translate(movement * speed * Time.deltaTime);
                }
            }
            catch (System.Exception) { }
        }
    }
}
Note, it is important to ensure your port is correct or the data will not be sent, the port can change so keep an awareness, it is easy to find what port you are connected to by looking via the Arduino IDE.
Joystick Example
- This project uses the Joystick Library, which will allow your computer to interpret your Arduino as a joystick
Note: Your Arduino must be HID compatible.
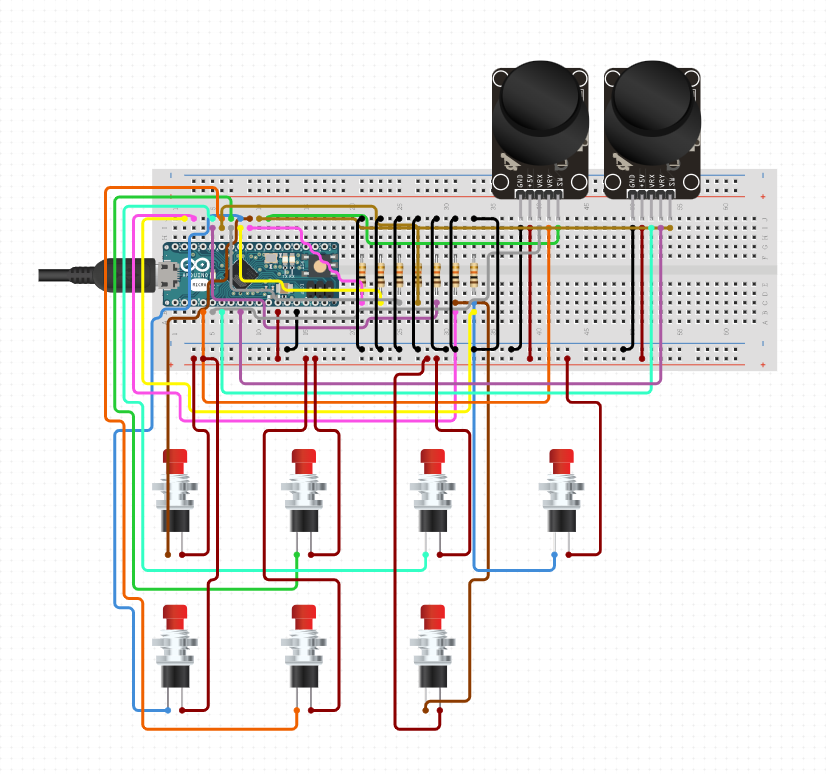
Arduino Code for Joystick Project
Working Joystick code provided for reference, observe and adjust as needed. In particular, PIN’s often differ between models of arduino.
#include <Gamepad.h>
#include <Keyboard.h>

const int buttonxPin = 9;
const int buttonupPin = 8;
const int buttongPin = 7;

const int buttonrPin = 14;
const int buttonfPin =5 ;

const int buttonctrlPin = 16;
const int buttonePin = 6;

char tabKey = KEY_TAB;
int rightXcenter = 500;
int rightYcenter = 500;
int leftXcenter = 500;
int leftYcenter = 500;
double multiplierRX = 0.254;
double multiplierRY = 0.254;
double multiplierLX = 0.254;
double multiplierLY = 0.254;
char ctrlKey = KEY_LEFT_CTRL;

Gamepad gp;

void setup() {
  pinMode(A0, INPUT);
  pinMode(A1, INPUT);
  pinMode(A2, INPUT);
  pinMode(A3, INPUT);
  pinMode(3, INPUT_PULLUP);
  pinMode(4, INPUT_PULLUP);

  calibrate();

  pinMode(buttonfPin, INPUT_PULLUP);
  pinMode(buttonePin, INPUT_PULLUP);
  pinMode(buttonxPin, INPUT_PULLUP);
  pinMode(buttongPin, INPUT_PULLUP);
  pinMode(buttonrPin, INPUT_PULLUP);
  pinMode(buttonctrlPin, INPUT_PULLUP);
  pinMode(buttonupPin, INPUT_PULLUP);
  Keyboard.begin();

}

void loop() {
  int lx, ly, rx, ry;
  lx = analogRead(A3);
  ly = analogRead(A2);
  rx = analogRead(A1);
  ry = analogRead(A0);

  lx = round((lx - leftXcenter) * multiplierLX);
  ly = round((ly - leftYcenter) * multiplierLY);
  rx = round((rx - rightXcenter) * multiplierRX);
  ry = round((ry - rightYcenter) * multiplierRY);

  if (lx > 127) lx = 127;
  if (ly > 127) ly = 127;
  if (rx > 127) rx = 127;
  if (ry > 127) ry = 127;

  gp.setLeftXaxis(lx);
  gp.setRightXaxis(rx);
  gp.setLeftYaxis(ly);
  gp.setRightYaxis(ry);

  int rightStickButton, leftStickButton;
  rightStickButton = digitalRead(3);
  leftStickButton = digitalRead(4);

  if (rightStickButton == LOW) {
    gp.setButtonState(11, true);
    Keyboard.write('x');
    delay(50);
  } else {
    gp.setButtonState(11, false);
  }

  if (leftStickButton == LOW) {
    gp.setButtonState(10, true);
    Keyboard.press(KEY_TAB);
    delay(50);
  } else {
    gp.setButtonState(10, false);
    Keyboard.release(KEY_TAB);
  }

  delay(20);

  if (digitalRead(buttonfPin) == LOW) {
    Keyboard.write('f');
    delay(50);
  }

  if (digitalRead(buttonePin) == LOW) {
    Keyboard.write('e');
    delay(50);
  }

  if (digitalRead(buttonupPin) == LOW) {
    Keyboard.write(KEY_UP_ARROW);
    delay(5);
  }

  if (digitalRead(buttongPin) == LOW) {
    Keyboard.write('g');
    delay(50);
  }

  if (digitalRead(buttonxPin) == LOW) {
    Keyboard.write('x');
    delay(50);
  }
  if (digitalRead(buttonrPin) == LOW) {
    Keyboard.write('r');
    delay(50);
  }
  if (digitalRead(buttonctrlPin) == LOW) {
    Keyboard.press(ctrlKey);
    delay(50);
  }
}

void calibrate() {
  int lx, ly, rx, ry;
  int i = 0;
  while (i < 8) {
    lx = analogRead(A3);
    ly = analogRead(A2);
    rx = analogRead(A1);
    ry = analogRead(A0);
    bool validLX = lx > (leftXcenter - 100) && lx < (leftXcenter + 100);
    bool validLY = ly > (leftYcenter - 100) && ly < (leftYcenter + 100);
    bool validRX = rx > (rightXcenter - 100) && rx < (rightXcenter + 100);
    bool validRY = ry > (rightYcenter - 100) && ry < (rightYcenter + 100);
    if (validLX && validLY && validRX && validRY) {
      i++;
    } else {
      i = 0;
    }
    delay(20);
  }
  leftXcenter = lx;
  leftYcenter = ly;
  rightXcenter = rx;
  rightYcenter = ry;
  multiplierLX = (double)127 / (double)lx;
  multiplierLY = (double)127 / (double)ly;
  multiplierRX = (double)127 / (double)rx;
  multiplierRY = (double)127 / (double)ry;
}